استرجاع الملفات المحذوفة من الفلاشة

برنامج Recover My Files من أفضل البرامج التي تساعد على استعادة الملفات المحذوفة من الفلاشة
الطريقة بالانجليزية (يمكنك استعمال ترجمة جوجل)
Introducing Recover My Files
Recover My Files was first commercially released in 2002. More than 10 years later is remains the leader in home and business recovery software. Recover My Files will recover:
- Deleted or lost files;
- Formatted Disks;
- RAW Disks;
- Missing Drive Letters;
- Windows Re-installs or Windows system restores
It is designed specifically to allow non technical computer users to quickly and simply recover data.
Safe Recovery
Recover My Files is designed so that it does not alter the contents of the drive being searched. This way you can evaluate the software with confidence and determine if your files can be recovered. Our aim is to provide you with absolute confidence that your data can be recovered before you purchase a license key to save your files.
Full File Preview
The version of Recover My Files that is downloaded from our website is fully functional. It will allow you to preview the contents of documents and graphics that it locates on your computer. You must purchase a product activation key before you can save your files. You must save files to other storage media (eg. another hard drive, external USB drive or network drive).
What type of search should I run on my computer with Recover My Files?
When you start Recover My Files data recovery software using the desktop icon, you are presented with a wizard screen that provides two data recovery options, “Recover Files” or “Recover Drive”.
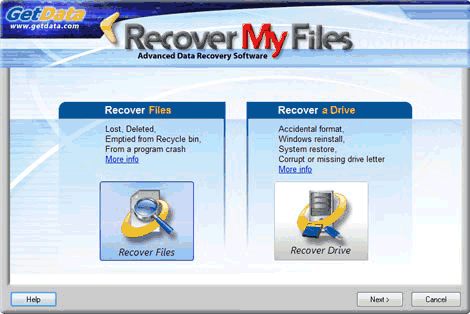
As a general data recovery guide:
- if you have deleted files, first use the “Recover Files” option;
- if you have a corrupt or formatted hard drive, first use the “Recover Drive” option
- try the “automated” mode first, as it is configured for the best and fastest search on most systems.
Running the “Recover Files” search
The “Recover Files” options is best used when you hard drive is running correctly, but:
- individual files have been deleted and emptied from the Windows Recycle Bin;
- files have been deleted and bypassed the Windows Recycle Bin;
- files have been deleted by a virus, trojan or worm;
- a file of the same name has saved over another important file;
- files have been lost by some other unknown cause.
To search for deleted or lost files, click the “Recover Files” button then “Next” to proceed. (NB: If your data loss problem relates to loss of data from the entire drive, select instead try the “Recover Drive” option).
Running the “Recover Drive” search
The “Recover Drive” options is best used when:
- a drive has been formatted;
- a drive has been formatted and windows has been reinstalled;
- a Windows recovery or system restore has resulted in a fresh installation of Windows and the previous user created files are missing;
- a drive letter has gone missing;
- the drive is recognized by your PC as RAW and not files can be read;
- or some other problem has effected the entire contents of the drive.
Recover Drive
The Recover Drive search is best used when:
- a drive has been formatted;
- a drive has been formatted and windows has been reinstalled;
- a Windows recovery or system restore has resulted in a fresh installation of Windows and the previous user created files are missing;
- a drive letter has gone missing;
- the drive is recognized by your PC as RAW and no files can be read;
- or some other problem has effected the entire contents of the drive.
- It can be used for both NTFS and FAT data recovery
Click the Recover Drive button, then click the Next button.
Hard disk data recovery
The next wizard screen performs a scan to identify the hard disks, digital cameras, USB drives etc. that are connected to your computer. Select the disk that you wish to search by clicking it with you mouse.
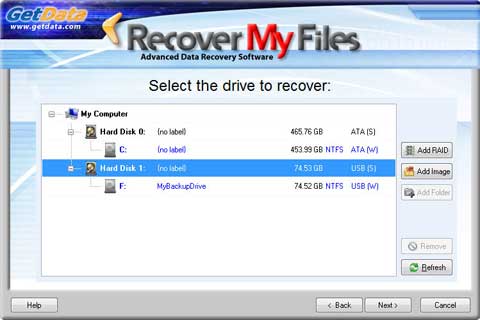
When running a “Recover Drive” it is usually best to select and search the entire “Hard Disk”.
Look for the “hard disk” which is the size of your problem drive (“Hard Disk 0” is usually where the C: drive is located, a secondary drive is “Hard Disk 1”, etc).
When you perform hard disk data recovery, you are telling Recover My Files to ignore any partitions (drive letters) that are found on the disk, and treat the entire drive as a single block of data. In many cases this is the best way to undelete all possible files and get data back. (Note: by searching the physical drive, Recover My Files will also find and display existing files which have not been deleted or lost).
“Automatic drive recovery” (Recommended)
During an automatic drive recovery, common pre-selected file types (Avi, EXE, iTunes, Jpeg, Microsoft Excel and Word and Zip files) are used to assist in locating the missing file system. The aim is to recover the full file and folder structure including ALL files. Recover My Files searches for these file types by locating the header / structure and footer and then uses the information found to help pinpoint the missing file system. These files are called “Lost Files”.
“Drive recovery using selected file types”
This option allows the user to manually select the file types to assist in locating the missing Filesystem.
It is suggested that you only use this option if the problem disk does not contain any of the common file types. For example, if the problem drive had only HTML files on it, it would be necessary to select the HTML file type.
In most cases the automatic mode is best and additional file type selections will NOT be required to locate the entire file and folder structure containing all files.
You may consider adding it to the list if you have a specific file type that is essential to recover. The benefit of adding a file types is that in addition to helping locate the file system, you are simultaneously searching for the Lost File type by looking for its header, structure and footer. If the file system has been destroyed and cannot be recovered, you may still find the important file as a Lost File. However, be aware that adding file types will slow down the search. We suggest that you do not select more than 10 file types at any time.
Search Phase 1 – Identifying Disk Structure
Recover My Files identifies the existing structure of the disk and the type of file system (e.g. FAT or NTFS) that is installed. This is very fast and will only take a few seconds.
Search Phase 2 – Partition Recovery
Recover My Files attempts to locate and rebuild then entire lost partitions. It does two passes down the disk. Partition recovery will take up to 15 minutes to complete (depending on the size of the drive, the number of files that it contains and the speed of the computer / drive).
Search Phase 3 – Rebuild and Display Partitions
Partitions located during phase 2 are rebuilt and displayed in the search results screen.
Whilst the search is in progress, expand the partitions (in “Folder” view using the ‘+’ icon) to determine if your missing files have been located. Use the different views, sort, gallery, and filter options to find your files. If you find your flies and can preview them SKIP the remainder of the search and save your files.
Search Phase 4 – Searching for File System records using selected file types
Recover My Files uses the selected file types to help locate the missing filesystem records (the file and folder structure) on the drive. The number of file system records found is displayed in the progress bar. Each Filesystem Record represents a file with its full file and folder name.
If you are in a hurry to recovery your data:
When the number of “Files and Folders:” found reaches a high number (an average home computer has between 50,000 and 150,000 Filesystem records), stops increasing, and remains constant, it means the file system records located have been read. On your average home PC you should reach this point within 2 hours of searching. You can press the STOP button (note down the ‘block’ number that the search is up to in case you wish to recommence the search at a later time);
or, if time is not a concern to you, let the search run to the end.
Once you have stopped the search, or the search finishes, the search results will build and display in “Folder” view of the results screen as a “Recovered Partition”. Expand the search results (using the ‘+’) to determine if your missing files have been located.
The “Recover Files” options is best used when you hard drive is running correctly, but:
- individual files have been deleted and emptied from the Windows Recycle Bin;
- files have been deleted and bypassed the Windows Recycle Bin;
- files have been deleted by a virus, trojan or worm;
- a file of the same name has saved over another important file;
- files have been lost by some other unknown cause.
In the fist Recover My Files wizard window, click on the Recover Files icon, then click the Next button.
Selecting the drive to recover
The next wizard screen performs a scan to identify the devices (hard drives, digital camera, USB drive etc) that are connected to your computer. Select the device you wish to search by clicking it with you mouse to high-light it.
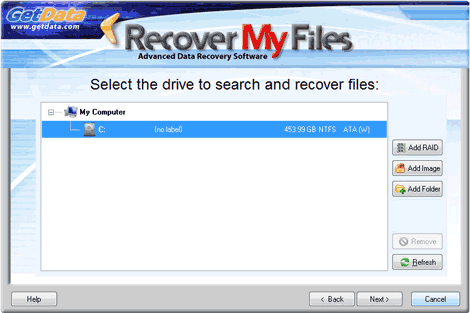
When running a “Recover Files” search, select and search the drive letter on which the files were lost.
Search for Deleted Files (Recommended)
A Deleted File is a file that has been emptied from the Recycle Bin and marked as deleted by the Filesystem, but which retains sufficient information held in the Filesystem to be recovered.
This search is “Recommended” because:
- It will rapidly scan the File System for deleted files (the search will take less that 1 hour on a standard home PC);
- If files were recently deleted, there is a high probability of success;
- Files located will have their original file names and folder structure intact.
Search for Deleted Files, then search for selected Lost File Types
This search first runs the search for Deleted Files, as described above. It then sequentially scans the remaining area of the disk for “Lost Files”.
Following a file deletion, subsequent activity on the computer may lead to File System records for these files being destroyed. A “Lost File” is a file that has been deleted which no longer has a Filesystem record (e.g. and entry in the Microsoft FAT or MFT), but the content of the file remains on the disk and can be recovered.
Recover My Files does a sequential search of the disk to identify “Lost Files” by their internal file structure, (i.e. their header, content and footer). This is often referred to as a “file header search” or “data carving”.
Lost Files do not have a file name (as file names are held only in the file system records and not with the file data) and are called “LostFile_FileType_X”.
It is suggested that this search be run when:
- The recommended “Search for deleted files” option did not find your files;
- When you wish to be certain that all possible data on the drive can be located and recovered.
Important: The more file types that are selected, the more resource intensive is these search and the longer the search will take. It is suggested that you do not perform a Lost File search for more than 10 files at any one time.
Previewing the search results and saving recovered files
It is possible to preview the search results whilst the search is in progress.
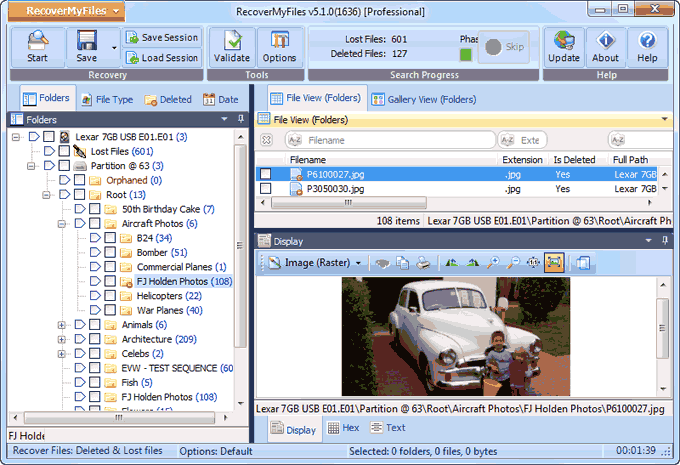
The Recover My Files search results screen has four tabs:
- “Folder” Tab: The “Folder Tab” is used to display the file and folder structure of the search results and is similar to how Windows displays the files and folders in Windows Explorer.
In Recover Files mode, it displays the file and folder structure of Deleted Files.
In Disk Recover mode, it displays the files and folder structure of recovered partitions.
When files are selected and save from Folder view, the folder structure of the saved files will replicate what is displayed here. - File Type tab: File Type view lists files according to their extension. This can be used as a fast way to locate a file when the type is know but the original folder location is not. The “Other Extensions” folder contains all other file extensions not specifically selected in the search.
- Date tab: The “Date” view sorts files by date. This can be useful to quickly locate digital camera pictures and other files that were known to be created at a specific point in time. The date used in the sort is changed by selecting Create, Modified or Accessed at the bottom of this window.
- Find tab: The Find tab is used to search through the existing search results for relevant files based on your selected search criteria. A find can only be run once a search is completed.
Expand folders in the results screen by clicking on the “+” sign. Click on individual file to display the preview of the file in the bottom window of the results screen.
Please note: The download version of Recover My Files is the FULL VERSION. It is not necessary to run a second search. Activating the program gives the ability to save recovered files. It does not change the search results.
Saving Search Results
Recover My Files must be activated in order to save files. A product activation key can be purchased at our purchase page. To enter the product activation key click ‘Help’ and then ‘Activate Product.’.
Select files to be saved in the results screen by placing a tick in the box next to the file. To select multiple files to be saved hold down the CNTRL key, use your mouse to select the files that you wish to save, and then press the SPACE BAR to add or remove ticks. You can also use the SHIFT key to select group of files in this fashion.
Once you have selected the recovered files that you wish to save, click the save button. You must save files to a separate storage media to the one on which they were recovered.